Showing posts with label Halloween. Show all posts

Friday, 31 October 2014

Halloween Teeth! and Butternut Squash Soup ....

!Happy Halloween!

Weird but nice :)
Butternut/Pumpkin Soup Easy Recipe for Halloween


Lovely Squashes :o)

Friday, 24 January 2014

Chocolate Biscuits with Marshmallow or Chocolate Cream fillings

Choc Bix before filling :) - they bake slightly darker - my photo came out a little bright!
Ingredients for Bix:
5ozs (75g) butter
5 ozs. caster sugar
2 yolks
9 ozs. (250g) SR Flour
1oz. (25g) cocoa powder  (1 good tablespoon)

In a food processor, process all the above ingredients until blended (almost) together.  Dont over-process the dough.
Knead together, lightly, cover, and leave in fridge for about 20 mins. or longer.

At this stage you can 'sausage roll' the dough in Klingfilm and either keep it in the fridge or freeze it.

When ready to use : either cut very thin slices off the roll and place on a greased baking tray - they dont spread too much when baking.  OR
Roll out on a lightly floured surface and cut into shapes
bake at 190 deg.C for about 10mins.

These are lovely just baked and still warm - they go crispy as they cool.

Marshmallow Filling: - this can also be made in advance.

250ml (9fl oz) double cream
·  55g (2oz) marshmallows
·  250g (9oz) good-quality dark chocolate, chopped

Heat the cream and marshmallows until the cream is just boiling and the marshmallows have melted, stirring continuously ..... The filling can be used as is
Otherwise you can add the chocolate:
Pour over the chopped chocolate and mix gently until smooth, thick and glossy
It will thicken as it gets cold - (leave covered in fridge.)

Another (Buttercream) filling:
1.1/2 ozs. butter
1.1/2 ozs. icing sugar
1 dessertspoon of cocoa powder
Cream all the ingredients together 

Wednesday, 7 November 2012

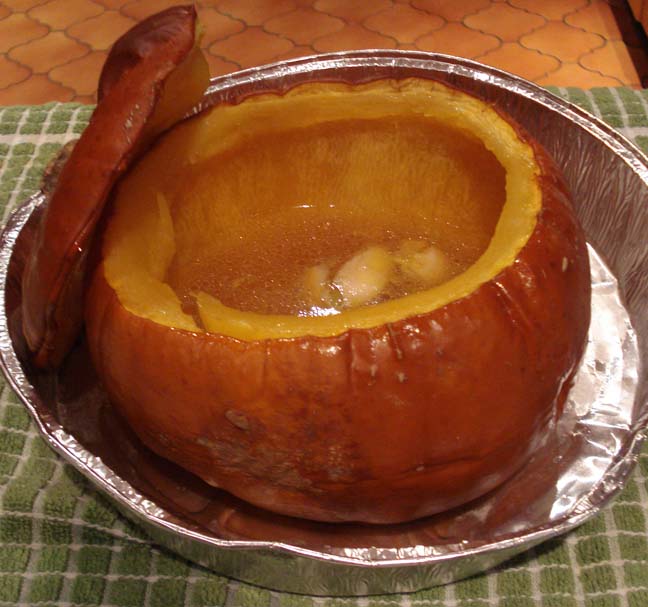
Baked Pumpkin Soup with Horseradish

I found this quite an easy way to scoop out the pumpkin flesh, 
without having to peel and chop up the pumpkin before cooking.
Ingredients for Stage 1:
Oven: 180/190 deg. C
1 pumpkin
salt, pepper, maple syrup  - of course :), 
cloves of garlic to own taste, knob of butter and a  little olive/sunflower oil.

1. Cut off the top part of the pumpkin, scoop out the seeds and place the above ingredients inside. 
2. Replace the lid, pour a small amount of water in the bottom of the dish, and bake until the skin is going brown, and the flesh is soft.
3. Remove from the oven and cool slightly.
Stage 2:
4. Carefully pour the liquid into a separate bowl.
5. Use 2 spoons, one for holding down, and the other for scooping out the cooked flesh - put this into the bowl too - discarding the skin.
Pour into your liquidiser.
Add a stock cube and enough water to well cover, (or home made stock), and liquidise until you get a nice creamy consistency. Add either more stock as necessary, and a little milk/cream if wanted.  Adjust seasoning.

Serving suggestion:
in each bowl - add either, a knob of butter, cream (sweet or sour), 
or a teaspoon of creamed horseradish - the horseradish just slightly takes away some of the sweetness - if you've gone a bit mad with the maple syrup!

Tuesday, 30 October 2012

Halloween -Witches Fingers & Apple Monsters!


 I found these two ideas in The Times today - I think kids will love to make them.
The witches fingers seem a little fiddly, but look great - and the sort of ghoulish things kids love to eat :).  I haven't given instructions for the Apple Monster as this seems pretty self-explanatory - but I like this best :)


Witches Fingers: - makes 30
Oven 180 deg.C/350/Gas 4
Blanched, slivered almonds
Red Gel food colouring
2 eggs
1/4 tsp. vanilla extract
115g (cold) salted butter
65g icing sugar
3 tbls. granulated sugar, pinch of salt, 
210g plain flour

1. Place the almonds in a single layer on baking trays.  Mix together a couple of drops of food colouring with a couple of drops of water and paint one side of each nail with a thin paintbrush.  Set aside to dry.
2. Separate one egg - put the white in a separate bowl and set aside.  In another small bowl, whisk together yolk, remaining egg and vanilla.  Set aside.
3. Cut the butter into chunks and combine with the sugars and salt.  Beat until well combined.
4. Add the yolk mix. and beat until smooth (about 2 mins) Add the flour in 2 additions, mix on low speed until just incorporated.  Wrap the dough in plastic film and chill for about 20 - 30 mins until firm.
5. Line 2 baking trays with parchment and divide the dough in half.  Keep one half wrapped in the film while working with the other one.  
6. Divide it into15 pieces and roll each piece into finger shapes 3-4" long.  Pinch the dough in 2 places to form the knuckles. and score each knuckle lightly with a knife.
7. Place the fingers on a baking tray and freeze for 5-10 mins.
8. Lightly beat the egg white with a fork - remove the finges from the freezer and immediately brush lightly with egg white.  Position on the nails, pushing on gently.
Bake until lightly browned - about 10-12 mins.
Cool on wire racks.

from: Decorating Cookies by Bridget Edwards.

bakeat350.blogspot.co.uk - 
.......... lovely website.